The Sentinel of the Caprock Observatory (SOCO) is a small private observatory located in the Texas High Plains near Lubbock, Texas. The Texas High Plains is a plateau with an elevation of around 1 km above sea level. The eastern border of this plateau, where it falls away to the lower Rolling Plains of Texas, is called the Caprock. It gets this name from the layer of hard rock that "caps" the plateau, a geological feature that is exposed here as the plateau falls away to the land below. A sentinel is a "watcher" (particularly at night), so the "Sentinal of the Caprock" is a watcher of the night skies perched along the edge of the Caprock. The climate of the Texas High Plains is semi-arid, which is conducive to clear nights that favor astronomical observing. As shown in Figure 1, around 40-50% of the days are clear, and the distribution of clear days is relatively uniform over the year.
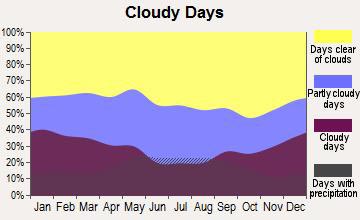 | Figure 1. Distribution of clear and cloudy days over the year for Lubbock, Texas. |
| | |
At the time of the construction of SOCO, there were a number of choices for the observatory building. Based on size and price, the candidates were narrowed down to two choices: the SkyShed POD and the PolyDome ExploraDome. Both choices are good products and each has advantages and disadvantages. Luckily, an excellent comparison of the two designs was available from Jim Weilsek and Chris Schroeder posted on the Cloudy Nights community website. Ultimately, the severe weather resistance of the two designs was the deciding factor in choosing the ExploraDome over the POD. The Texas High Plains frequently experiences severe thunderstorms, so resistance to leaking was considered to be very important.
In March of 2012, a Model RBBLD-8 "Deluxe ExploraDome White Dome w/Black Lining with 8' Round Building" was delivered to the SOCO location. Dimensions of this model are shown in Figure 2. The plastic dome was delivered as one piece. The sheet metal panels for the walls, the PVC base ring, and the plastic upper ring on which the dome rotates comprised the un-assembled lower portion of the structure.
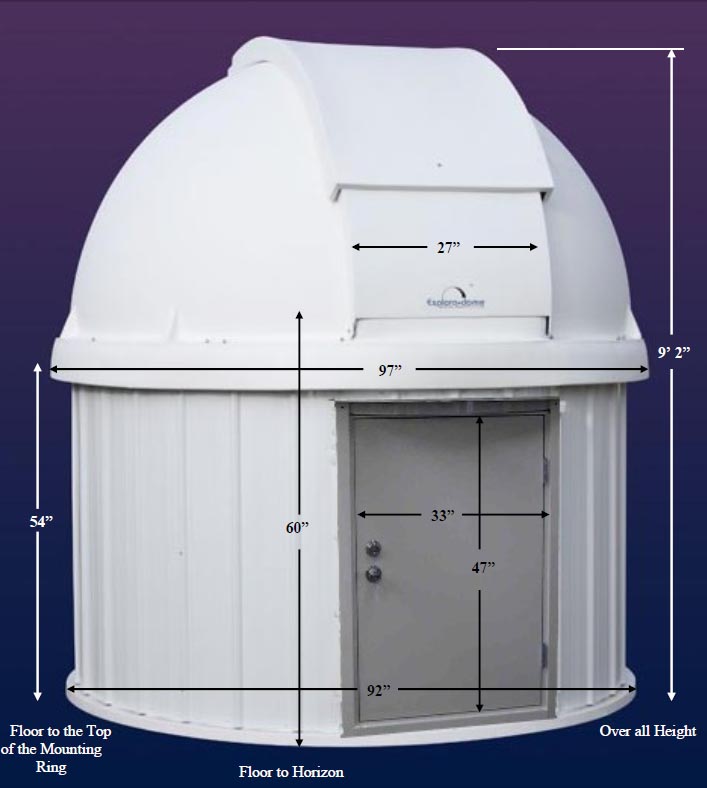 | Figure 2. Dimensions of the Model RBBLD-8 ExploraDome. |
| | |
SOCO Construction, Phase I
SOCO was set up on an existing deck. The first step was to set up the telescope pier. A number of good commercial piers are available. However, I had seen an example where an individual had built their own pier out of 4" X 4" pressure-treated posts. When bolted together, four created an extremely strong pier with two advantages over metal piers. First, the coefficient of thermal expansion of wood is less than metal, so a wood pier is less affected by temperature changes than a metal pier. Second, wood is better at absorbing vibration than metal, so a wood pier should transmit less vibration to the telescope as compared to a metal pier. A wooden pier was assembled from four posts held together by carriage bolts (Figure 3). The pier included a custom-fabricated adapter on top for attaching the telescope mount. The pier was easy to assemble and was relatively inexpensive.
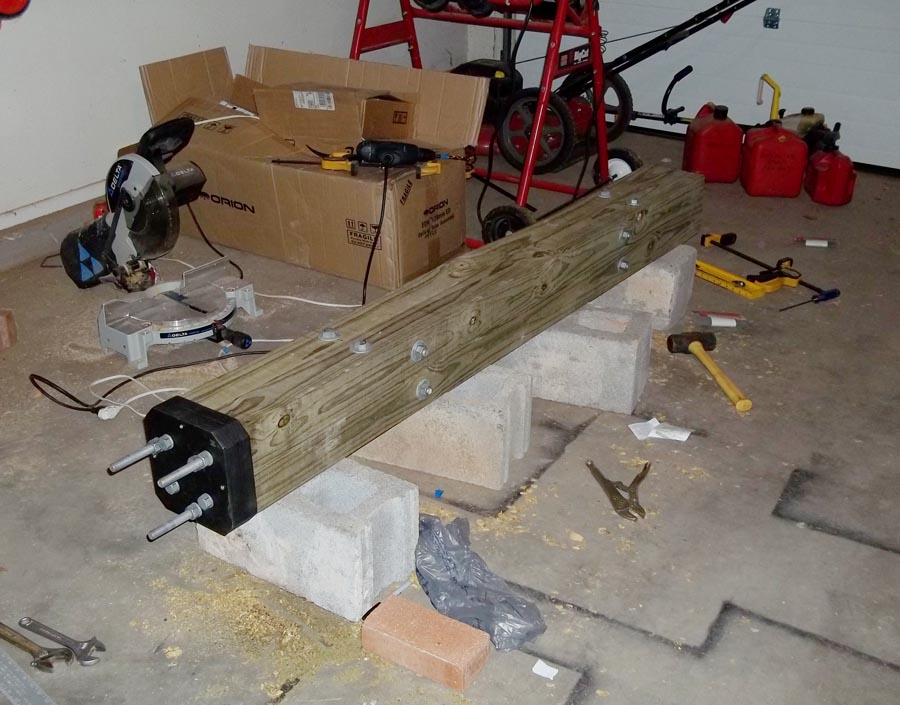 | Figure 3. The wooden pier assembled from four 4" X 4" pressure-treated posts. |
| | |
Since the observatory building was to be built on the existing deck, isolating the pier from the deck was crucial to prevent vibrations being transmitted from the deck to the pier. A section of decking was removed from the deck and a hole was dug in the soil underneath. The hole was roughly square and measured about 2' on a side. The hole was dug 18" deep, a depth at which bedrock was encountered. The pier was positioned in the hole midway between the closest pair of joists so that there would be no contact between the pier and the structures supporting the deck. The hole was then filled with concrete. The pier was braced as the concrete hardened to insure that it was perfectly vertical, as measured using bubble levels. When the concrete had cured, the decking was replaced, except that a square hole was fashioned in the decking through which the pier protruded. A 0.5" gap was left between the pier and the decking to insure that there was no direct contact between them. The finished pier is shown in Figure 4.
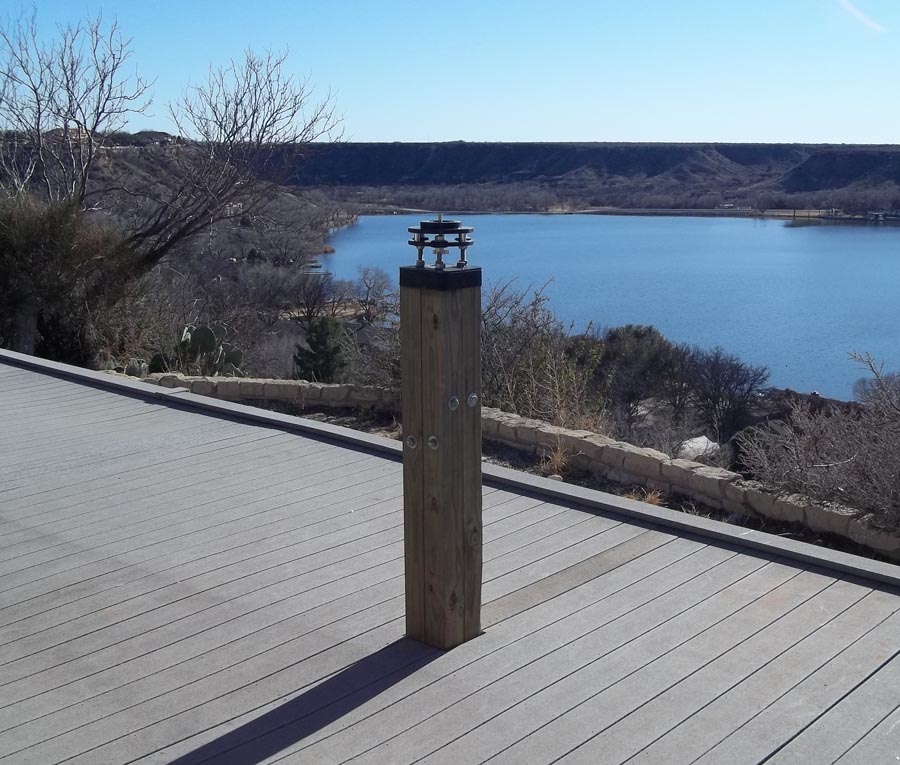 | Figure 4. The finished pier. |
| | |
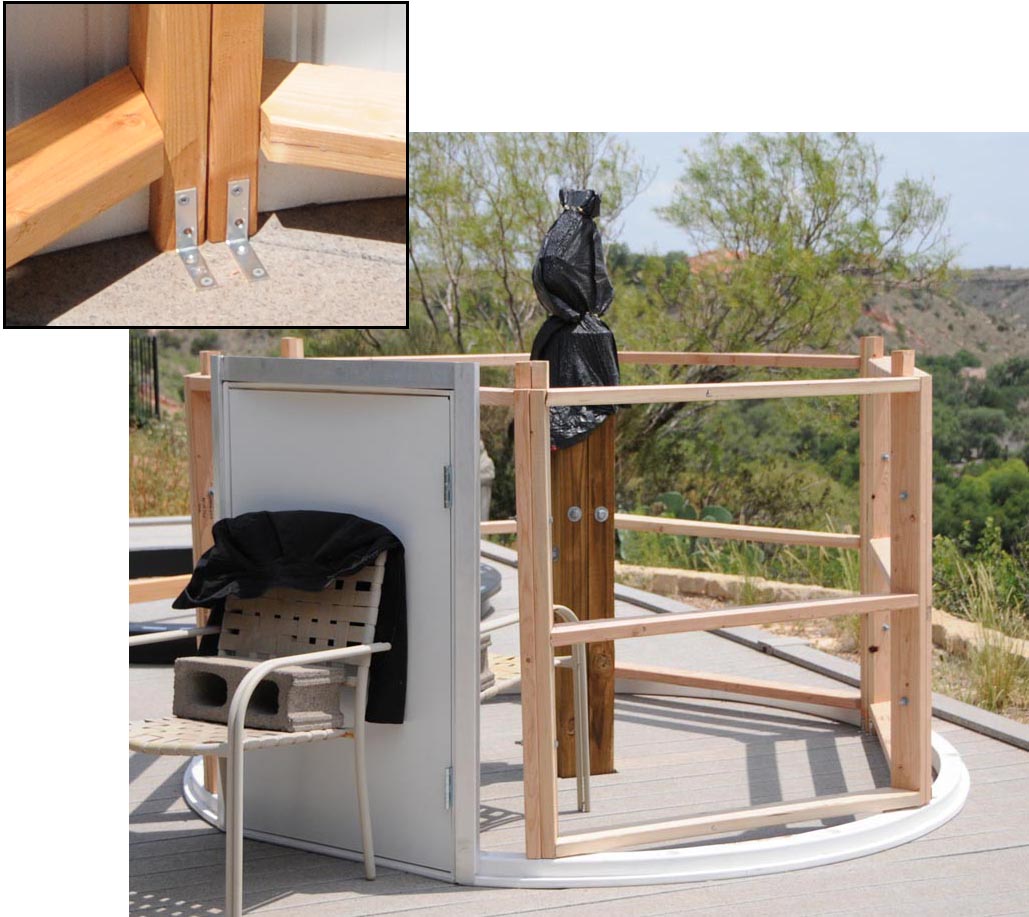
The observatory building was built around the pier. Early on, a major modification was made to the ExploraDome structure. In the original design of the ExploraDome, the dome is supported entirely by the sheet metal walls and the door frame. While this circular structure is fairly rigid, it was felt that it might not stand up to the strong winds associated with thunderstorms that frequently occur in this region. Such winds, hitting the side of the observatory structure, might put enough lateral stress on the walls to cause them to collapse under the weight of the dome. To increase the rigidity of the lower circular portion of the structure, a hexagonal frame was designed to support the dome and provide attachment for the sheet metal walls. This frame was constructed from 2X4's and formed a rigid unit that could easily support the weight of the dome without the sheet metal walls bearing any of the dome's weight. These 2X4's didn't need to be pressure-treated, since they are inside the observatory building. I did varnish them on the bottom ends where they make contact with the deck. This hexagonal frame is shown in Figure 5.
|
| Figure 5. The hexagonal frame built to support the weight of the observatory dome. The chairs are holding the door up, since it was not attached to the frame at this point in the construction. The inset shows that the frame was attached both to the deck and to the circular PVC base ring using long screws. |
The hexagonal frame was designed so that the circular plastic ring upon which the dome rotates would fit snuggly upon it. This is shown in Figure 6. Also shown is the system of casters attached to the upper ring that supports and guides the rotation of the dome.
|
| Figure 6. View showing the hexagonal frame supporting the upper ring upon which the dome rotates. |
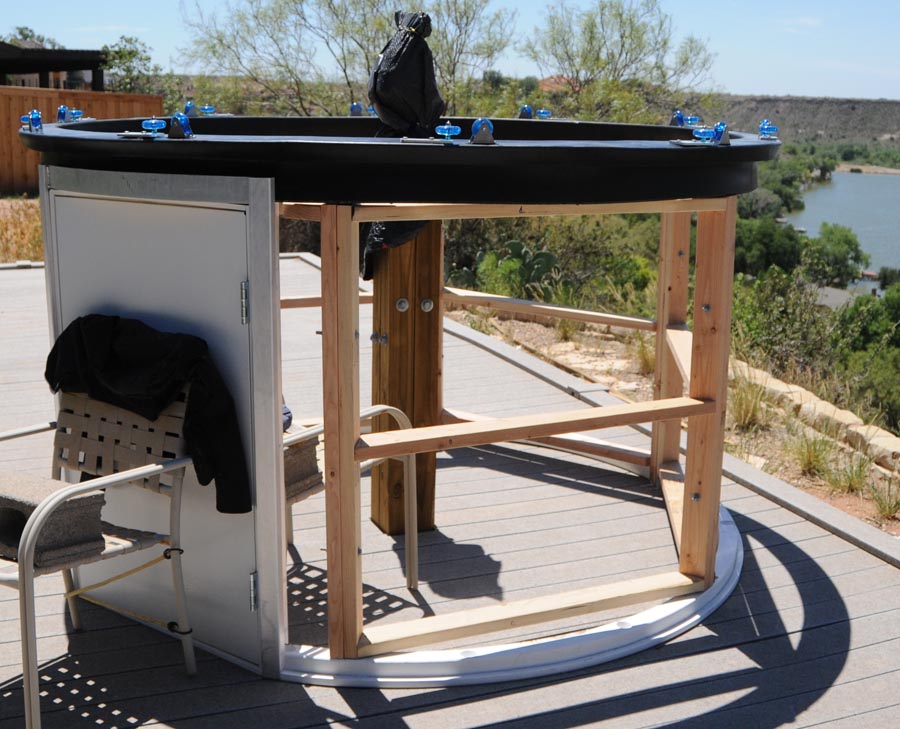
Once the hexagonal frame and upper ring were completed, the sheet metal walls could be attached. This is shown in Figure 7. The walls came in 7 pieces. The edges of adjacent pieces overlapped and were attached using nuts and bolts spaced along the edges. This required the help of a second person. There had to be one person outside the structure holding the bolt, while the other person inside the structure tightened the nut. I'm indebted to my friend and former graduate student, Song Cui, for his help. The sheet metal walls were attached to the hexagonal frame with screws. At this point, the bottom portion of the observatory was pretty much complete. It looks like the standard ExploraDome setup, since there's little indication of the internal hexagonal structure. The entire structure is very rigid and shows no tendency to flex if you push on a side. In fact, if you removed the screws holding the structure to the deck, you could pick up the whole thing as one unit.
|
| Figure 7. View showing the sheet metal walls attached. |
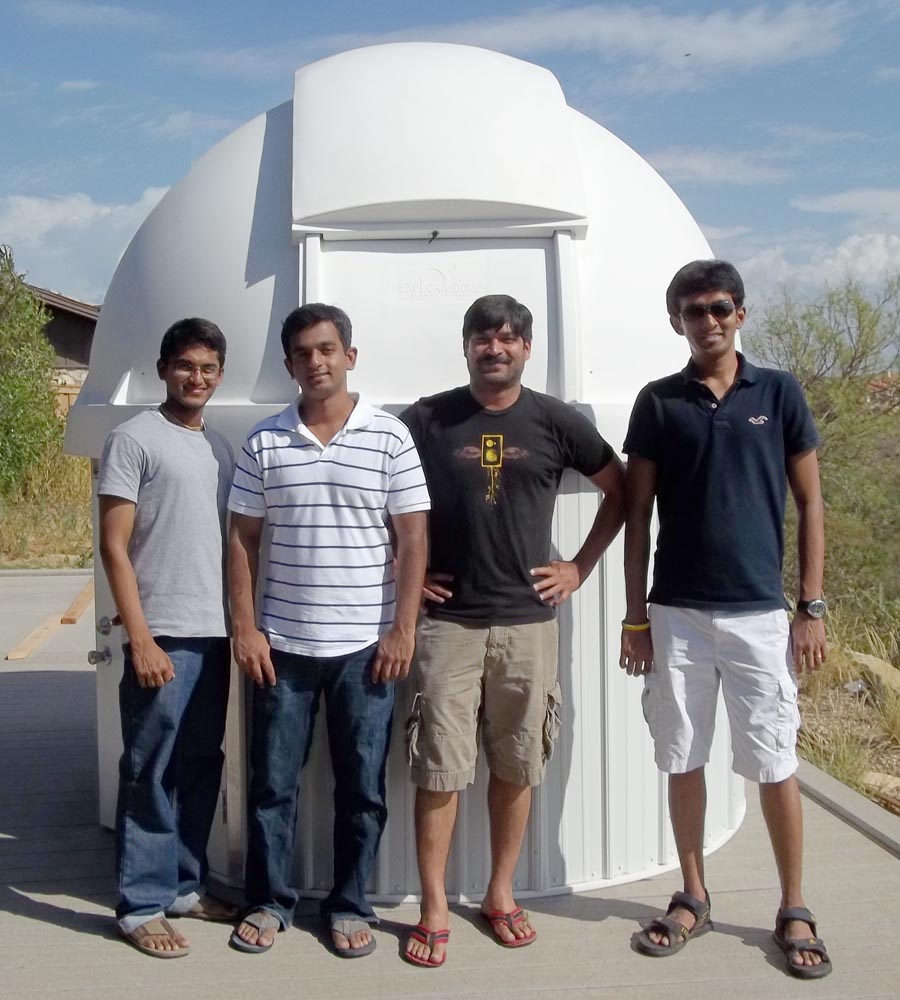
The only major remaining task was placing the dome on top of the lower part of the observatory. This was straight-forward-- just pick it up and set it down on the system of casters on the upper ring. This was accomplished by the group of able-bodied assistants (at the time, current and former graduate students) shown in Figure 8. Once the dome was placed on the observatory, a retaining ring was attached under the lower lip of the dome to prevent it from coming off.
|
| Figure 8. The able-bodied crew that placed the dome on the observatory. |
As a final touch, a floor was placed inside the observatory (Figure 9). Since water might seep beneath the base ring of the structure during heavy rains, the floor was designed to be raised above the level of the deck. First, a plastic lattice was placed on top of the deck inside the observatory to raise the floor above the deck. A fiberboard floor was then placed on top of the lattice. This arrangement keeps the floor dry even if water seeps under the base ring. I had an electrician come out and wire the observatory for AC power. I could have done it myself, but an electrician has to inspect it anyway to insure it's up to code, so it was easier to just let them do it. This brings up an important consideration involving setting up an observatory at a location. The rural community in which SOCO is located is pretty lenient in terms of building codes. The observatory building is viewed simply as a small detached outbuilding (like any other small shed), so there weren't any significant restrictions on its construction (other than electrical). This might not be the case for other locations, particularly those within cities. It's always best to check the codes before you build.

|
| Figure 9. The plastic lattice sub-floor (left) and fiberboard floor (right) inside the observatory. |
Construction of SOCO took around 3 months of off-and-on labor. Except for the two cases noted above where help was needed, the construction was performed solely by myself. The ExploraDome has turned out to be a good choice for this geographical region. It has withstood intense thunderstorms with sustained winds of 60 mph and gusts of over 80 mph. These winds were associated with driving rain and hail. In no situation has any water made it into the observatory. This is a strong testament to the excellent design of the ExploraDome and, in particular, to the design of the hatch in the dome that effectively prevents water entry when closed. The original design was modified to include the internal hexagonal frame, but this feature probably wouldn't be needed in areas with more benign weather conditions.
SOCO Construction, Phase II
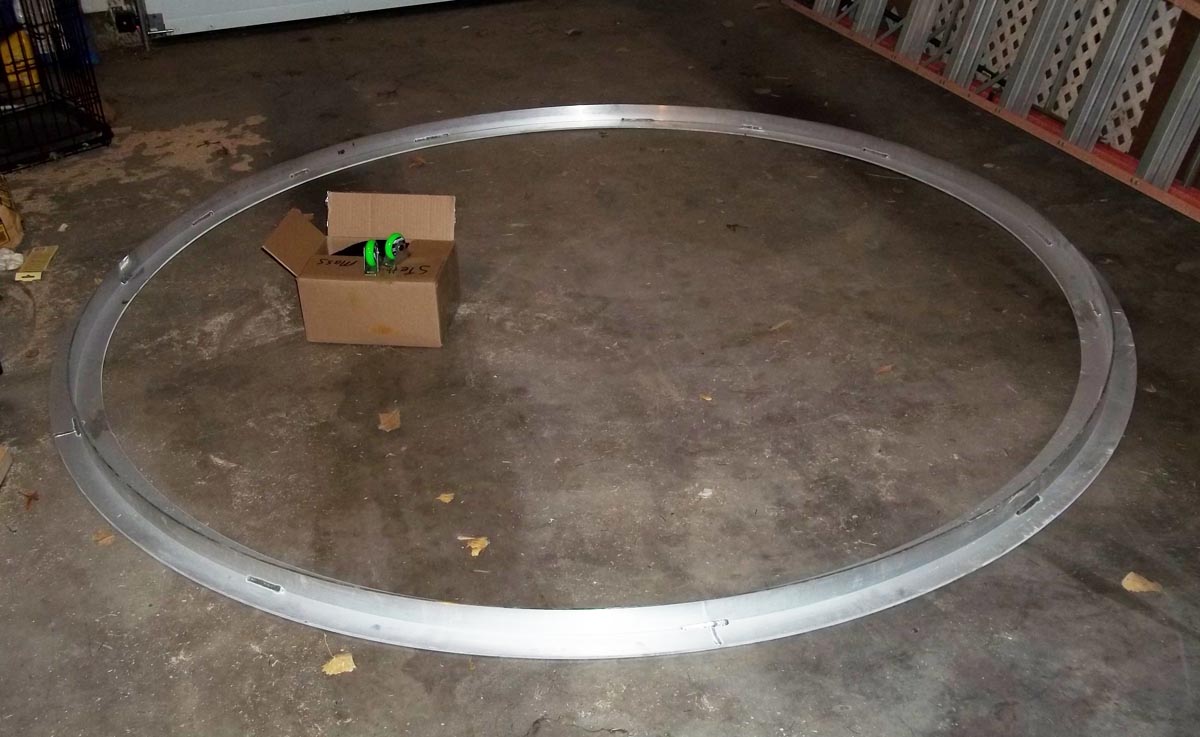
One of the disadvantages of the original ExploraDome design involved the rotation of the dome. The casters which allowed rotation of the dome ran in a circular plastic track attached to the underside of the dome. Unfortunately, the dome had a tendency to get out-of-round. This would cause the dome to bind when rotated, particularly on cold nights when the plastic dome would become stiff. This problem was recognized by the manufacturer, and in early 2013 they began to provide a solid aluminum track that could be retrofit into the domes of existing ExploraDome installations. I was quick to order one (Figure 10). After removing the dome from the observatory (again with the help of several assistants), installing the retrofit track was easy. After removing a few bolts, the old plastic track was removed and the new aluminum track was installed in its place. The dome was then placed back on the observatory. The new aluminum track completely solved the dome rotation problem by forcing the dome to stay round. In fact, the dome could be rotated with the smallest effort after the retrofit.
|
| Figure 10. The retrofit solid aluminum track for the dome. The box contains new heavy-duty casters supplied by PolyDome for use with the new track. |
PolyDome provides several options for automating the movement of the dome. These include systems for rotating the dome and opening/closing the hatch. These operations can be linked to software (like Foster Systems or Maxim DL) to allow the dome to track the movement of the telescope. This is needed if the observatory is intended to run in an unattended mode. To date, I haven't invested in these systems. Since I'm usually hanging around the observatory during imaging sessions, it's easy enough for me to manually operate the dome.
SOCO Today
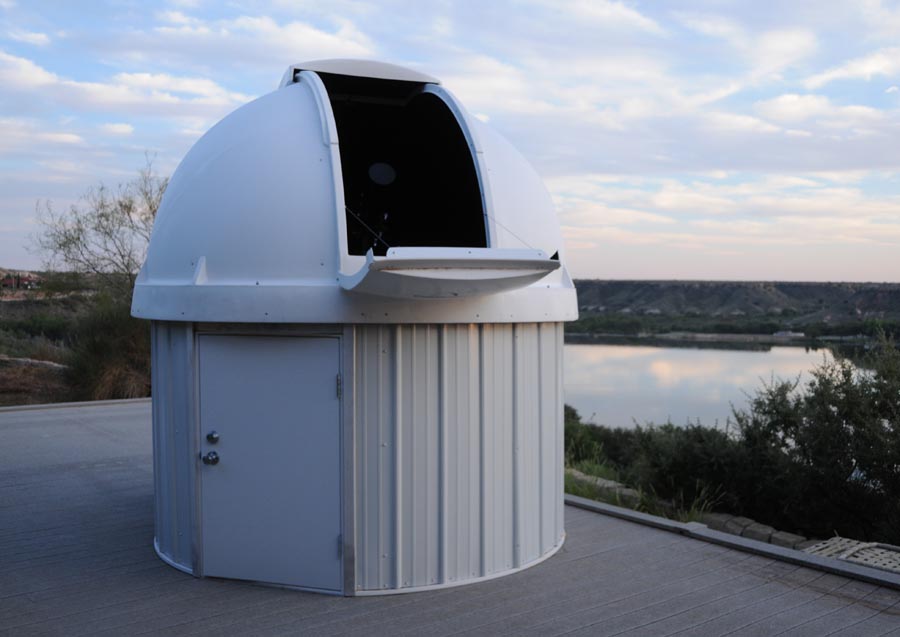
The ExploraDome has performed flawlessly for several years now and shows no significant signs of wear. It has played a significant positive role in my astro-imaging in several respects. First, it's great to be able to have all your equipment set up and waiting for you. No setting up tripods, polar-aligning mounts, lugging scopes and accessories around, and setting up power supplies. All you have to do is go out and turn everything on. Second, the observatory allows you keep all the components of your imaging system (scope, mount, camera, filter wheel, autoguider, etc.) assembled. This reduces the possibility of accidents during setup and take-down, and minimizes the ability of dust to get into the components. Finally, the observatory has allowed me to successfully image even on windy nights. The Texas High Plains is known for being windy, particularly in the winter and spring. The hatch in the dome can be opened enough to allow imaging, but closed enough to keep out the gusts. If you've got lights around your location (street lights, security lights), an observatory can do a good job of screening your telescope from them. In all, I've probably spent around $5000 in setting up the observatory building, but the cost has been well worth it. I have to echo the sentiments of other amateur astronomers in saying, "If you're serious about astronomy, get an observatory."

 Return to SOCO Main Page